This is where I share my thoughts of polish, pets, life in general. Click on any of the tabs below to find out more about the Pointless Cafe Blog.

FB Plugin

Tracking

Showing posts with label Copy-Caturday. Show all posts

Saturday, May 18, 2013

Copy-Caturday! With a Jelly Stamping Sandwich...or Two


*These Products are Cruelty Free 


Tonight I have my Copy-Caturday post for you - better late than never! This time, I'm copying 4Boys 1Mom Lacquer's gorgeous mani. Check her out and give her a follow on Twitter and a like on Facebook - her swatches are gorgeous.


4Boys 1Mom Lacquer


I didn't have that stamping plate of course, so I used BM318...


The Nail Junkie Blueberry Neon Shimmer Jelly

I actually DID take photos after clean-up, I just can't find them! UGH!

And later this week I did another one using The Nail Junkie Strawberry Neon Shimmer Jelly...


The Nail Junkie Strawberry Neon Shimmer Jelly


I love these for a couple of reasons. 1) It gets me over my fear of "jelly sandwiches" 2) I can do a jelly sandwich without glitter and 3) It hides the imperfections in my stamping! So...BIG shout out to Jennifer of 4Boys 1Mom! What a fantastic idea!

The Nail Junkie polishes are available at The Nail Junkie Etsy Store here.  Also, you definitely need to follow The Nail Junkie blog and Facebook page for updates and announcements. 


If you enjoyed this post, please take a second to "like" it! Thanks!

.

Saturday, May 11, 2013

Copy-Caturday! With "Black and White Toile" Nail Art

Personal Collection 
*Unsure if Products are Cruelty Free 


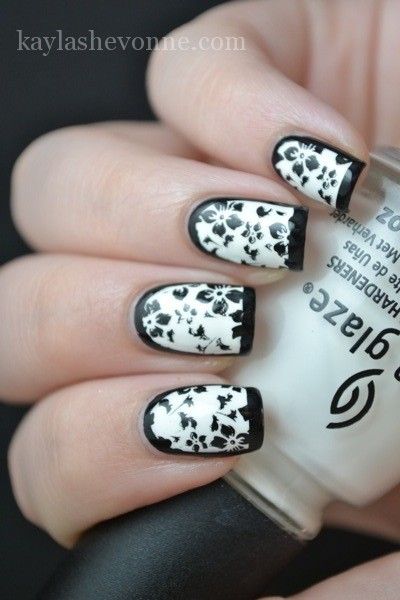
Happy Saturday! Today's Copy-Caturday mani is taken from Nails by Kayla Shevonne - if you don't follow her, you should - she has awesome nail art!

My nail art today isn't an exact copy because my attempts at nail art usually don't work out like I hoped when they started out. And this one is no exception. But it's really not bad for me. It sort of looks like black and white toile!


Black and White Toile Nail Art
Inspired by Kayla Shevonne's Framed Floral Mani


Here's the perfect mani I attempted to copy. Kayla Shevonne's Framed Floral. (I didn't have the same stamping plate and my freehand border isn't as perfect. My image didn't really work well so I freehanded some of the "stamped" part too.)


Kayla Shevonne's Framed Floral Mani


I used Pure Ice Black Out for the black and Salon Perfect Sugar Cube for the white. I started with a base of white and used a striping brush for the border and parts of the inside part where I messed up the stamping.

What do you think? I really am enjoying trying new things in my attempts to improve my nail art!


If you enjoyed this post, please take a second to "like" it! Thanks!

.

Saturday, May 4, 2013

Copy-Caturday! Sponge Mani Starring piCture pOlish

From my Personal Collection 
*These products are Cruelty Free 


Well, today's Copy-Caturday post isn't exactly correct. As I get more comfortable with "nail art" I find that I want to try things on my own more often, so I didn't really copy anyone for this manicure.


Sponge Mani Nail Art with piCture pOlish


Try and fail, that is LOL! This isn't exactly a fail, per se, but it's not what I started out going for...I was trying to do a cool tie dye mani and it ended up just being a sponge mani. Which is fine.

I used six different piCture pOlish polishes and a make-up sponge. First, I put down a base of piCture pOlish N*de and then sponged over it using Amethyst, Attitude, Cosmos, Focus and Mad Magenta dotted onto a triangular make-up sponge and "smushed" together. One coat of Poshe top coat finished it off.


Sponge Mani Nail Art with piCture pOlish

Sponge Mani Nail Art with piCture pOlish

Sponge Mani Nail Art with piCture pOlish

Sponge Mani Nail Art with piCture pOlish


If you want EASY nail art, this is the way to go. I think it looks pretty cool and it's even better at arm's length than the close-up pics.

Is this something you would try?

These shades, along with the rest of their piCture pOlish and Ozotic lines, are available directly from piCture pOlish and also you can check The Network to see which Network Members carry which shades. The Network Members for the US are Kim at Overall Beauty and Leah Ann at Llarowe and for Canada it's Katie at Harlow and Company.


*This was not a sponsored post

If you enjoyed this post, please take a second to "like" it! Thanks!

.

Saturday, April 13, 2013

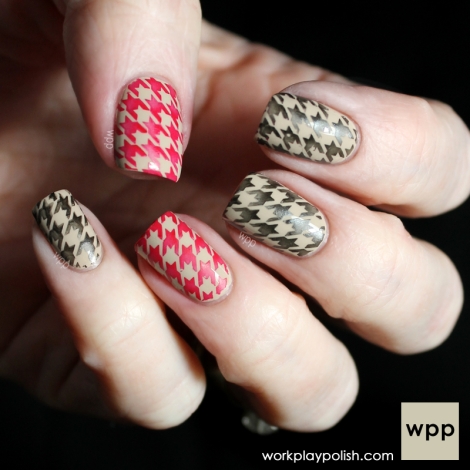
Copy-Caturday! Houndstooth Stamping - copied from WorkPlayPolish - Sort of...


Nails Inc. Black Taxi and The Thames


Okay, so...I tried to copy-cat a mani I saw over at WorkPlayPolish. Hers was GORGEOUS. My attempt was a fail (which I'll show you like I promised) the first time around. My houndstooth image was larger than hers and I'm not good at stamping.

Here's a teaser photo of her lovely mani - head on over and show her some love and see the rest of the photos and the post here.

Houndstooth Stamp with Zoya Farah, Raven and Carment (work / play / polish)
THIS is what is SHOULD look like.


Then I got the the ultimate stamper. Which one is the ultimate stamper you ask? This one.


XL Stamper - available here

Now I can no longer blame my stamping on my little stamper that came in the $10 drugstore kit. And there's still blame to be had because I haven't mastered stamping yet, which will be obvious, but the fault lies squarely on my shoulders now and not the stamper. But I'm a big girl. I can handle it. And hopefully I'll get better with practice.


So here's what I ended up doing: Nails Inc. The Thames as a base and Nails Inc. Black Taxi for the stamping. Image from Bundle Monster 322 plate.


Houndstooth Stamping - Nail Art

Houndstooth Stamping - Nail Art


I've ordered the large DRK-A plate with the smaller houndstooth image more like what WorkPlayPolish used. So I will be trying again because I LOVE houndstooth.

And as promised...with the larger houndstooth image and the bad stamper.

What NOT to do. LOL!


So there you have it - another installment of my adventures in stamping! It's gotta get better!


If you enjoyed this post, please take a second to "like" it! Thanks!

.
Saturday, April 6, 2013

Copy-Caturday! With Globe and Nail's Reciprocal Gradient


Happy Saturday! Time for Copy-Caturday again - my attempt at copying some great nail art I've seen that inspired me to keep trying.

Today I'm copying a great gradient I saw over at Globe and Nail. She calls it a reciprocal gradient and went into a "math" explanation about why, which made my brain shut down immediately. But I know I was enthralled with the look of it.

I did something similar the other day - a sideways reciprocal gradient using browns and when I found out what to call it is when I found Globe and Nail's awesome mani. Go check it out!


Reciprocal Gradient Nail Art

Reciprocal Gradient Nail Art


Not the best, but I'm pretty happy with it for now. I will be practicing more though because I think this is just such a cool look! What do you think? Will you be trying it?

Click here for Globe and Nail's tutorial. I hadn't seen the tutorial until after I did this one so next time I will use more than three per nail and I'll get them straighter.


Happy Weekend!


If you enjoyed this post, please take a second to "like" it! Thanks!

.

Saturday, March 9, 2013

Copy-Caturday! With Cherry Blossoms


It's Copy-Caturday again!!! Today I have one for you that I really didn't exactly "copy" but was more "inspired" I guess. I reviewed a nail polish by Above the Curve last week called Cherry Blossoms and thought "Wow I wish I could paint cherry blossoms on my nails as nail art." So I thought I'd give it a try!

I used Revlon Coastal Surf for the blue, then sponged on Pure Ice Super Star white on the sides/tips and then sponged over the white with Milani Pink Express. I used Milani Dark Coffee for the branches and Zoya Morgan and Milani Pink Express for the blossoms.

Not great for some of the great nail art people out there, but for me it is! This is what happened...

Cell pic before top coat, which you may have seen on Facebook.


Cherry Blossoms Nail Art


I had every good intention of cleaning up after I top coated, but I decided to try doing my right hand too and just never got around to it. But I get points for trying on my right hand, though, right?


Left hand with top coat...


Cherry Blossoms Nail Art

Cherry Blossoms Nail Art


And my right hand with top coat...messier and more child-like, but I'm proud of myself for trying!


Cherry Blossoms Nail Art - right hand


Like I said, I didn't really copy anyone this time, but since then, I've google-imaged cherry blossom nail art and I think I'm going to try this one next time I try cherry blossoms...check out Polish and Patience's cherry blossoms here!


Happy Saturday!


If you enjoyed this post, please take a second to "like" it! Thanks!

.

Saturday, March 2, 2013

Copy-Caturday! Holy Cow!


Saturday again which means it's Copy-Caturday! Today I headed out to the farm...


Cow Nail Art


For this mani I used Chanel Eastern Light for the base, Orly Liquid Vinyl for the spots and Sinful Colors Fusion Neon for the snout. I used a dotting tool for the spots and a striper brush for the Moo.

And who did I copy, you ask? I copied Christa over at ChrissyAi - go check her out if you haven't already. For the direct link to her Moo Mani, click here. ♥

What do you think? Udder madness? *giggle*


If you enjoyed this post, please take a second to "like" it! Thanks!

.

Saturday, February 16, 2013

Copy-Caturday with Argyle Nails!


Seems like I JUST did copy-Caturday! How does time pass so quickly? But I'm pretty excited to show you this attempt. The inspiration mani was gorgeous and I think I did okay for my first try. This time I'm copying MissJenFABULOUS over at Polish and Pearls with her fabulous argyle nails. To see my inspiration, click here.

I've used Milani Pink Express, one of the newest 2013 High Speed Fast Dry polishes, Milani White on the Spot, Milani Flashy Silver and Milani Black Swift.


Argyle Nails

Argyle Nails


I'm actually fairly happy with how these turned out for a change! What do you think?


If you enjoyed this post, please take a second to "like" it! Thanks!

.

Saturday, February 9, 2013

Copy-Caturday! Sarah's French Tip Gradient


It's Saturday, er I mean Copy-Caturday again!!!

Tonight I'm copy-catting another manicure from Sarah at Chalkboard Nails - French Tip Gradient. I adore gradients and haven't had much luck getting them to look smooth but I actually think I did better on this one! Practice is helping. Of course it's not as flawless as the original, but at least I'm improving.

To see Sarah's awesome French Tip Gradient, which was my inspiration, click here! I didn't use the same polishes because I am so pale and Shay is a little better on me, although I still haven't found my perfect manne hands polish.

I used Zoya Shay as the "mannequin hands" color as a base and then I used a make-up sponge with Shay and Milani White On The Spot for the gradient. One coat of Poshe top coat to finish it off.


French Tip Gradient

French Tip Gradient


Having a few cuticle issues because of the weather here and you can still see some sponge marks but I'm definitely happy with this attempt.

What do you think? Check out the rest of Sarah's Nail Art at her blog or on her Pinterest Boards.


If you enjoyed this post, please take a second to "like" it! Thanks!

.

Saturday, February 2, 2013

Copy-Caturday! Tortoise Shell Nails


Happy Copy-Caturday! Saturdays are the days I've set aside to ATTEMPT to re-create a favorite mani that caught my eye. I picked a real doozie this time.

The lovely Sarah at Chalkboard Nails did an awesome Tortoise Shell mani using the Brown Trio from Elevation Polish. I got my own Brown Trio today and thought, Hey, why not?

So I gave is a shot. And I vowed that no matter how badly it turned out, I would STILL post it so you guys could see the fails along with the successes.


Tortoise Shell Mani using Elevation Polish Brown Trio

Tortoise Shell Mani using Elevation Polish Brown Trio

Tortoise Shell Mani using Elevation Polish Brown Trio


I used the caramel one, Temperance, as a base and then I put splotches of the brick, Cascade, and the dark brown, Tettegouche with additional splotches of Temperance. I finished up with a generous coat of Poshe top coat.

Here is a bottle shot of all three of these new jellies from Elevation Polish.


Elevation Polish Brown Trio:  Cascade, Temperance and Tettegouche


Here is the quick and dirty skittles mani I did with them when I got them. Three coats for opacity and you get that great squishy jelly goodness with a high shine. (No top coat for these photos.)


Elevation Polish Brown Trio:  Cascade, Temperance and Tettegouche - indirect sun

Elevation Polish Brown Trio:  Cascade, Temperance and Tettegouche - indirect sun

Elevation Polish Brown Trio:  Cascade, Temperance and Tettegouche - artificial light


So...

Take a look a Sarah's gorgeous Tortoise Shell mani here. Hers is absolutely amazing! But hey, at least I tried!

What have you tried this week? SHOW ME! Post your manis on my Facebook page!

*Elevation Polishes are available at her shop here and retail for $8 for full-sized bottles. You can also follow her blog for news, re-stock information, new collections, etc. She re-stocks on the 7th and 22nd of each month.


If you enjoyed this post, please take a second to "like" it! Thanks!

.

Saturday, January 26, 2013

Copy-Caturday - Gradient with Stamping


As I told you, one of my goals this year is to try more nail art. I'm not really good at it but I'm hoping practice makes perfect.

So...I decided to try Copy-Caturdays! I will attempt to copy-cat a nail design that I love on Saturdays, or on Copy-Caturday, I should say.

Tonight I have my interpretation of a FANTASTIC manicure I saw from Jacki at Adventures in Acetone. She did a great gradient with stamping in her review of some stamping plates and while I don't have the polishes she used or the stamping plate image, I decided to try my interpretation of it using what I have.

So I started out with OPI You Don't Know Jacques (this is one I had from before going cruelty-free) and did a sponge gradient with that and Pure Ice All Night Long. I used butter LONDON's matte top coat over it - the BEST matte top coat out there, in my opinion.


Blue and Taupe Gradient


And then I picked out an image from one of my new Bundle Monster stamping plates (BM-312) and stamped over the gradient using Milani Flashy Silver.


Blue Taupe Gradient with Stamping

Blue Taupe Gradient with Stamping


So what do you think? Just remember, I'm still learning and practicing so be kind! But I will show you the failures along with the successes, so it could get quite funny!

And don't forget to visit Jacki's post at Adventures in Acetone to see where I got my inspiration.

Here's a teaser photo for you...


Of course hers is To Die For Gorgeous but to misquote a line from As Good As It Gets: "Jacki, you make me want to do a better mani."

Thanks for looking! Have a GREAT weekend!


XOXO
Sheila ♥


If you enjoyed this post, please take a second to "like" it! Thanks!

.